Recipes
Smoothies That Combat Free Radicals July 03 2014
 If anytime we need more lycopene in our diet, it would be in the summer. Lycopene is found in red pigmented fruits, and it is used to fight free radicals to slow down our aging.
While it is important to apply a good quality sunscreen when engaging in outdoor activities, it is also important to replenish our body with loads of fruits and vegetables. Some variety of fruits for the summer would be watermelon, berries, papaya, and tomatoes.

One of my mom's cherry tomato vine has put out about a hundred clusters of tomatoes -- that's about 800 cherry tomatoes!! Boy is that plant super productive. With that many tomatoes, even after giving some to family and friends we still have a couple buckets left of them. Thus, I have been making all sorts of food with them such as some quickly pickled tomato, cucumber salads, roasted tomatoes, even smoothies.
Above shows you the last tomato smoothie I made, and I drank some with a celery that substituted a straw! I grow a celery variety that has hallow stem so it's pretty cool that I can use it as a straw. If you are interested in this smoothie, see the recipe below. Otherwise, if you are not a fan of tomatoes, or if you have arthritis, including too much tomatoes in your diet is not recommended. Some options for you non-tomato fans are watermelon with coconut water smoothie, strawberry smoothie, papaya with milk or almond milk smoothie. You cannot go wrong with any of these classic healthy beverages!
Ingredients:
as much ripe tomatoes as you like!
1/2-1 stalk of celery
1/2-1 stalk of Ashitaba (optional)
1 small piece of kelp seaweed (this adds the savory taste)
1 shot of vodka (totally optional! Just fun if you are hosting a party)
To make:
Blend all ingredients except for vodka in a blender. I would add voda for individual glasses when it is ready to serve. Not everyone wants to drink! ;D
Garlic Chicken Salad June 06 2014

It was a bit strange for me to make a dish fried in oil again, but I was really craving for a good chicken salad after an evening of workout in the garden. After working so hard, it's always important to replenish your body with protein so your muscles can rebuild and not tear apart.
I fried this chicken breast in very low heat with olive oil. Since olive oil has a very low smoking point, I kept the heat fairly low to retain it's nutritional properties and for the chicken to not taste so greasy. I really wanted the keep the moisture and flavor inside the meat. Hope you'll enjoy this simple recipe that still feels fairly light to the stomach even with a fried ingredient. Feel free to change up or add anything you like in the salad.
Ingredients:
1 organic chicken breast
sea salt
garlic powder
olive oil
1/4 cup raspberries or any berries will do
mixed greens such as romaine or any lettuce
balsamic vinegar
cheese (optional. I prefer gorgonzola)
To make:
Pour a very thin layer of olive oil in pan and turn heat to setting next to the lowest.
Sprinkle both sides of the chicken with a little sea salt and garlic powder. Now let it cook at low heat until the meat is fully cooked. This should take about 20-30 mins.
While chicken is cooking, wash your hands thoroughly before starting to prepare for your salad. Include any lettuce, greens, and fruits you like.
Lay your salad in a bowl and drizzle olive oil and balsamic vinegar, mix salad well to coat.
When chicken is done, let it sit for 5 min. then cut in slices and place on top of salad.
Enjoy!
Vegan / Vegetarian Sushi May 06 2014
 Sometimes when I want to keep my food really simple, the taste can get very plain. In that case, I make sushi with the ingredients. It's a fun way to spice up the meal. Seaweed is not only nutritious, but brings a unique flavor to food. Sushi to me means using seaweed to wrap food so it could mean wrapping leftovers, or any food you have, or want to add inside. Just be creative! Even with the sauce, you can be as creative as you like, it doesn't have to be soy sauce. Think of it as any kind of a dipping sauce -- honey mustard, soy sauce and mustard, or even peanut butter soy sauce!
Ingredients in my sushi:
cooked rice
stir fry carrots and sprouted mung beans
lightly boiled fava beans
Nori Sushi Seaweed sheets of your choice
bamboo sushi mat
serrated knife
To make:
I'm going to assume you know how to boil and stir fry the ingredients and move on to explaining how to wrap the ingredients.
Place a bamboo sushi mat on the counter then place sushi sheet on top.
Spread rice to make a rectangle then press it flat to allow rice to stick to the sheet.
Lay other ingredients on top either by stacking neatly, or by random, but make sure to keep them all flat. This would make it much easier to roll. The key is to not overload your sheet or it would be difficult to roll your sushi. It can also tear easily.
Once all ingredients you want are placed on sheet let's start rolling!
To roll, use both hands and start rolling from the end that's close to you and roll it away from you. Do this very slowly while pressing down to keep it tight. Continue rolling until entire roll is complete.
To cut, use the serrated knife as a saw and saw it slowly. You will slowly gain more control of your cut as you do it. Place your bite size sushi on a plate and serve yourself!
Ingredients for my sauce:
organic soy sauce
mustard
garlic powder
To make:
Mix all ingredients together, use as much of each ingredients as you like. Slowly build the intensity / flavor until it is the way you like it.
Veggie Steak Tacos! May 01 2014
 I found that mushrooms are a good replacement for meat, especially the large Portobello mushrooms. They are beefy and meaty. I love the earthy flavor of mushrooms, and they can take on any flavor you put in. This whole week I have been loving Mexican-ish dishes. But, like most foods, I always add my own spin on it.
Here's a vegetarian / vegan way to make a taco taste delicious! Ingredients below is not meant to be followed exactly. It depends on how much you like in your tacos and how big your tacos are. Best to use the ingredients list as an idea or inspiration for creating your own vegetarian tacos.
Ingredients:
a small hand full of any fresh leafy greens you like for each taco (I used Gynura Procumbens)
1 bellpepper or 1/2 of each color bellpepper
1/2 onion
1/4-1/2 large Portobello mushroom (per mini taco)
tortilla (I used organic corn tortilla)
coconut oil (for stir frying. I used unrefined coconut oil)
salt and pepper, or soy sauce for taste
To make:
Slice or dice onions, bellpeppers whichever way you prefer then set aside. Drizzle a light coat of coconut oil in the pan and set stove to medium heat. Add cut onions and bellpeppers in pan and let it cook until soft, and a lightly caramelized.
For the Portobello mushroom -- Remove the stem part and cut them smaller then set aside. Allow onions and bellpeppers to cook for 5-10 minutes until soften a bit then make room in the center of pan to add the whole Portobello and the stem bits.
When the juice of mushroom begins to form, turn the mushroom over and let other side cook. Add salt and pepper, or a little soy sauce for taste. When all your ingredients soften, turn off heat and add salt and pepper, or soy sauce for taste. You can add some spices or even garlic powder on top if you like.
To heat up tortilla -- put a pan over the stove and set it on medium high heat. Place tortilla on pan and keep flipping it every 10-20 seconds. Be careful not to burn it.
Cut your mushroom in large chunks and put everything inside your taco. You can slice any fresh leafy greens to put on top.
Raw Vegan Silky Chocolate Pudding April 27 2014

 If you like sweets and chocolate, this is a must try recipe! The rich, silky chocolate will seduce you to wanting more. The best part is you can indulge the entire cup without feeling guilty because it's good for you! It is super easy to make and will be ready to serve right away, or you can let it chill for 10-15 minutes before serving.
This pudding / fudge was inspired by a mixture of cultures across the globe. Americans mostly think of using avocados in savory dishes, but in Vietnam we use it in a milkshake! Avocado has a neutral yet extremely velvety texture, it's perfect to use as a base for any creamy foods.
Learn about the benefits of avocado here!
Cinnamon I used in my pudding was hand carried back by my mom's trip to Vietnam. Vietnamese cinnamon is called Cassia. Cassia is not the same plant as cinnamon, but the aroma is so much stronger than regular cinnamon! When making chocolate desserts, I like adding a pinch of cinnamon, this will intensify the flavor of chocolate. If you don't have Cassia, regular cinnamon will do the job just fine!
Another ingredient that's in this simple recipe is Vanilla extract, and I wish to visit South America to pick my own Vanilla beans to make desserts one day...and take a hike in the rain forest of course! But we don't have to go that far to fetch our ingredients in the modern time, let's move on to the action now!
Ingredients (this will fit in a small ramekin):
1 medium size avocado
2 dates (the fresher the better as it will add to creamy texture)
2 tablespoons cacao powder
1 tablespoon raw honey (add more if needed)
2 tablespoons unrefined coconut oil
1/2 teaspoon vanilla extract
1/4 teaspoon cinnamon
1 blender or food processor, or mix by hand. (I used Vitamix blender)
To make:
Add all ingredients in the blender and blend until they mix well. Ingredients are pretty dry so you may need to stop the blender and stir a bit then blend again. If there's any imperfect mixes, you can always use a fork or spoon and mix it by hand. It's ready to serve right away, or let it chill for 10-15 minutes in the refrigerator. This will allow pudding to harden a bit.
Serve it with any fresh fruits of your preference on top. I normally had a homegrown strawberry, and sprinkle coconut flakes for garnish. However, when I make this dessert for guests, I'd spend a little extra effort for the WoW presentation. See below to find out how I made the strawberry roses. It isn't too hard, but it does take a little time to learn how to control the knife. This is my first time making them so this is as perfect as they get for now...Hope you'll enjoy this recipe with your family and friends. It's the most silky, dark chocolate pudding I have ever had!
To make strawberry rose:
Please checkout this video where I learned how to make it! Kudos to Chef Khmer. :)
Simple Asparagus March 25 2014
 Asparagus is one of those produce I tend to overlook. Perhaps it's in my memory that they tend to be very tough with lots of fiber. It's difficult to find young, thin ones. I finally came across some this week at the farmer's market so I was happy to pick up a couple bunches. It's nice to include a variety in your diet, but sometimes it's difficult since grocery stores near by are limited in their organic selections.
I made these for dinner and realized how much I do like asparagus. When you find some younger shoots, they really are tasty and easy for your chew! Below I would like to share a very simple recipe on making this dish. Sometimes it's the simplest things in life that makes one feel content.
Ingredients:
1 bunch of young asparagus
2 slices of lemon
1 tablespoon olive oil
1/8 teaspoon of salt
1-2 cloves of garlic sliced
fresh grind pepper of your choice (I used rainbow peppers)
3-4 tablespoons of water
To make:
Wash and clean the asparagus and let the water dry a bit. To break off the tougher portion of each one, use one hand to hold the end of the asparagus and the other hand on the middle and bend. The part where the toughness starts will break off. Do this to each one and you can save the tough part to boil in water and make a light soup if you like, but in this recipe you are only going to use the soft part.
Place a pan on the stove, set heat to medium then pour some olive oil inside. When the oil is warmed add garlic. Remember not to set the heat too high as olive oil can smoke at a lower temperature than some other oils. When garlic starts to soften and brown a little add asparagus. Turn asparagus every now and then and let it cook for a couple of minutes until soften a bit. Add a little bit of water that's just enough to layer the pan then place lid over the pan. Let it cook for approx. 2 mins. Remove lid to check if asparagus are softened. It's all in your preference here. I like mine pretty soft on the outside, but still has a light crunch. I don't like making my food mushy soft. This quickly steaming process helps to bring more green color in the vegetable out as well. When these are cooked to your desire softness, turn off the heat. Squeeze some lemon juice, sprinkle a little salt and pepper on top and it is ready to serve!
Almond Soda Bread (Smells like a giant Cookie!) February 25 2014
 I love making soda breads because it's quick and easy! After getting those basic ingredients down, you can be quite creative with adding whatever you like in your bread to change the flavor and texture. I love the taste of yeast breads, but they require hours, or even a whole day to rise. Soda breads are so much more wholesome and hardy. A couple of slices will feed you full!
Tonight I wanted to make my bread with a hint of almond fragrance. I really like almond cookies, but there is too much sugar in it if I plan on getting full on them. This Almond Soda Bread will remind you of that cookie, but in a much more wholesome way. The bread is quite crunchy with the wonderful almond aroma. It is so tempting everytime I walk near it, and just makes me want to cut another slice, then another slice...Haa
Ingredients:
1 2/3 cup of Veganic spelt flour
1/3 cup of organic unbleached white whole wheat flour
1/4 cup of steel cut oats
2/3 cup of buttermilk (checkout my DIY buttermilk using yogurt on the bottom)
1 teaspoon of cream of tartar
2 teaspoon of baking soda
3 teaspoon of vanilla extract
3 teaspoon of almond extract
a pinch of sea salt
2 tablespoon of Turbinado cane sugar
1/2 cup of walnuts (lightly chopped so it remains chunky)
1/3 cup of almonds (lightly chopped, or use a spice grinder for speed! :)
unrefine coconut oil
*you can add any nuts here, as many variety as you like. The more variety, the more hardy your bread will be. I would love to add pistachio if I had them. Pistachio and almond really compliments each other!
Ingredients for buttermilk:
2/3 cup unsweetened, plain yogurt
1 tablespoon raw apple cider vinegar
To Make:
Total bake time 45-50 min.
Preheat oven at 350F. Place a cast iron skillet or a cast iron crepe pan to heat up with the oven.
If you have pre-made buttermilk, prepare 2/3 cup to go in the dry ingredients in a moment. If you want to make your own like I did, here's how:
Mix the buttermilk ingredients together, stir and allow it to sit for at least 5 minutes.
To make the bread:
Use a sifter to sift spelt flour, unbleached white whole wheat flour, cream of tartar, and baking soda in a mixing bowl. Mix all dry ingredients in a mixing bowl. Add chopped walnuts and almonds in the mixing bowl, stir a couple times to mix nuts with other dry ingredients. Next, slowly pour buttermilk in and use a mixing spatula to fold the batter in. Instead of pressing the spatula into the dough, you use the folding technique to keep the air bubbles in the dough. If the dough is not completely adhering into one, add a little more yogurt, milk, or water to create more moisture to bind. You will know the dough is ready for baking when the dough form one large ball.
Now to grease your dough -- take enough coconut oil to smear it all over the dough ball. This will create a crunchy crust!
Open the oven, sprinkle some steel cut oats on the skillet. Place the dough on top of the steel cut oats and make a + sign on top of dough. This will help distribute heat throughout the bread more evenly.
Increase bake temperature to 400F and bake for 5 min. Next, increase bake temperature to 450F for 10 min then decrease temperature to 350F and bake for 20-25 min. When you smell the bread, that's usually a sign of it almost ready! Poke a skewer into the bread to check if bread is fully baked. The skewer will be clean/dry when you pull it out of the bread. If there's a lot of dough sticking to the skewer then your bread needs to bake for a little longer. Let it bake for another 2-5 min and check it with skewer again.
When bread is ready, remove it from skillet and place on a cooling wreck. Let it sit out to cool for bit then cut a slice to enjoy! :D
XGynura Coconut Delight February 06 2014
 This smoothie really satisfies my dessert craving. It is smooth, creamy, sweet and hydrating. It's extremely delicious and easy to make. The challenge is to find a good coconut water that is sweet. You can either use water of a fresh cut coconut or one in a can. In my experience, coconut water that's packaged in glass bottle taste best so if you could find that it would be the next best thing from a fresh coconut! Glass bottles seem to not alter the taste of the coconut like metal or paper cans. A couple of my favorite brands of bottled coconut water are called "Pure Young Coconut Water" by OK (Opportunity Knocks), and Nirvana.
Ingredients:
1 bottled or 1 fresh cut coconut water
8-12 Gynura Procumbens leaves
To Make:
Pour coconut water in blender, add Gynura leaves and blend away. Pour smoothie in a glass or pour it back in coconut (just for fun). The meat in the coconut is creamy and edible so take a spoon and scrape it to eat. Not a bit wasted! :D Enjoy!
Cold Fighter Smoothie February 05 2014
 This simple smoothie is a common cold fighter. This past month I have not been resting enough, and when the body doesn't get enough rest, the immune system weakens, causing our body more susceptible to catching a common cold. It's always best to knock the cold away before it actually gets to you. Learn to feel your body by understanding the symptoms of a cold. Early signs of a cold for me is usually that dry, scratchy, itchy throat, sometimes my ears and eyes may itch also, and eyes get more dry and makes me want to rub on them. The discomfort makes me want to keep rubbing my eyes and I often feel sleepy.
When I get this feeling, I'd run to the kitchen and find some veggies and fruits to make a smoothie. Smoothie is a quick way to take in lots of whole fruits and veggies, and the smoothie is so fine it allows the body to quickly absorb the nutrients. To fight a common cold, you'd need to boost your immune system with vitamin C, magnesium and zinc.
Since last week was Lunar New Year, I was helping at the temple and running my little shop, there was barely anytime to rest. Thank goodness I have raw veggies in my life or I would not be able to function in such a crazy schedule!
I want to share this simple recipe with you to fight those "soon-to-be" colds. My body immediately feels better after drinking this smoothie, and I hope it would do the same for you.
Ingredients:
1 orange
a few leaves of red/purple cabbage
3-4 thin slices of fresh ginger or a teaspoon of powdered ginger.
To Make:
Remove seeds from orange and place all ingredients in the blender and blend away!
This smoothie has a kick due to the ginger, but the orange will act as a sweetener and gives that nice tang to your cabbage drink. Raw cabbage is so high in vitamin C, and it has magnesium which is great for fighting a common cold. Ginger warms your body, improves blood circulation, and kills bacteria. Orange makes your smoothie tastier and adds another dose of vitamin C. Hurry, drink up and if you can, get some sleep! When you are not well, fuel your body with nutrients and get lots of rest. Your body will recover much quicker this way. Remember, it's always easier to get rid of a cold at the early stage.
Yogurt and Fresh Apples January 20 2014
 I was just feeling a bit lazy this morning, and wanted something quick and easy. Yogurt has probiotics (good bacteria) that keeps your immune system healthy. I usually like to dice up any fruits I have around and top it with nuts and honey to sweeten. I get probiotics from the yogurt, fiber from the apple, protein from the walnuts and more probiotics from honey -- so nourishing! Can't get any easier than this! If you are in a hurry, try some yogurt with fruits. :)
Ingredients:
yogurt
1 apple (diced/bite size)
1/3 cup of walnuts
honey to drizzle over fruits
To Make:
Yogurt goes on bottom of bowl then add fruits and drizzle honey on top!
Caesar dressing for your salad January 15 2014
 While I was working on my orders the other night, the Lydia in Italy show came on. When I heard Chef Lydia said, "Caesar Salad dressing" I turned my head to the TV. All I saw was a close up of egg yolk then I kept on working. The other night I attempted this dressing and since then I was hooked. It's actually quite easy to make. Here's my spin on it:
Ingredients for Dressing (makes about 3 servings):
2 hard boiled eggs (we are using egg yolks)
1 tablespoon of anchovy fish sauce (approx 2 anchovies chopped if you decide to use the jar kind instead)
1-2 tablespoon of apple cider vinegar
1/3 cup shredded Parmesan Reggiano cheese (I freshly grated mine)
1-2 teaspoon of garlic powder
1 teaspoon of fresh grind pepper
1/4-1/3 cup of olive oil
To Make:
Boil 2 eggs then extract the egg yolk. For the dressing we are only using the yolk. Set egg white aside, you can add this back to the salad later.
Add the rest of other ingredients with egg yolk and mix well.
Mix and taste. Add more olive oil to thin out dressing if needed. Add more Parmesan, garlic or pepper to your liking.
As for the Anchovy you can get the pre-cooked kind in a jar. I used fish sauce since it was available.
Ingredients for Salad:
a few leaves of cabbage (thinly sliced)
3 kale leaves (thinly sliced)
1 celery (cut to bite size)
1 radish (thinly sliced)
2 hard boiled egg whites (cut to bite size)
some croutons or make your own! use 2 slices of toasted bread
1 sprig of parsley
To Make:
Cut 2 slices of bread that's 1/2 inch thick and toast them. You can toast them a little longer if you like them harder/crunchier. Cut your toasts into cubes. This is just my super quick version of croutons. You can use actual croutons if you prefer.
Cut the rest of the vegetables and place in salad bowl. Make sure to slice kale and cabbage thinly since they tend to be more tough. Feel free to add or remove any ingredients in this salad and enjoy your Caesar salad!
Blueberry Spelt Soda Bread December 08 2013
 Soda bread is one of the basic breads I make on a regular basis, but sometimes I jazz it up with some ingredients I have around the house. Don't let the picture or the ingredient list scare you. This is really just your traditional Irish Soda Bread getting dressed up! It's a really hardy bread, great to toast up for breakfast, or as a healthy snack at anytime. You can add some jelly, butter and honey, peanut butter, or whatever you like! Take this to your family get togethers or home holiday parties and your friends will be impressed!
 Ingredients:
1 1/3 cup spelt flour
1/3 cup unbleached wheat flour
1/3 cup steel cut oats
1/4 or 1/3 cup of dried coconut flakes
1/3 cup blueberries (fresh or frozen)
1/3 cup flaxseeds powered
1 tablespoon whole flaxseeds (optional. this is only to add specs of texture in bread)
1/8 cup roasted almonds (lightly chopped)
1/8 cup roasted sunflower seeds
1/4 teaspoon nutmeg
1/2 teaspoon cinnamon
2 teaspoon baking soda
2/3 cup buttermilk
5-7 tablespoon honey
1/4 cup unrefined coconut oil
a pan or something you prefer to bake bread on. I used a cast iron pan.
Preheat oven at 350F.
Place the pan in the oven to get it hot.
Sift all flour in a large bowl. This would help the bread to have a lighter texture. Next, gather all other dry ingredients and whisk to mix well.
Add honey, coconut oil in dry ingredients. If coconut oil is hardened, scoop 1/4 cup in a small pot and lightly warm it up on the stove, under low heat until it liquifies. This would make your mixing easier than trying to break apart the large lumpy oil.
Slowly pour buttermilk in the mix and start to fold the dough until you made a ball shape. Your dough should look like crumbly cookie dough that is very moist.
Sprinkle some unbleached flour on working surface (we are kneading the bread!) Use both hands and take your dough ball to place on floured surface. Knead dough about 10 times to work the dough, make sure everything binds. Reshape the dough and grease/rub the entire dough with coconut oil.
Take pan out of oven and sprinkle light coat of steel cut oats on the pan then place the dough on top. Make a cross (+) on top of dough. This will help bread to cook evenly.
After putting dough in oven, increase temperature to 400F and bake for 6 mins.
Now increase oven to 450F and bake for 10 mins.
Now drop oven to 350F and bake for 20 mins.
Place a needle or stick in bread to check if it's ready. Your stick should pull out dry, without any dough sticking it.
Carefully, slowly remove bread and place on a cooling wreck.
Peanut Butter and Carrots September 05 2013
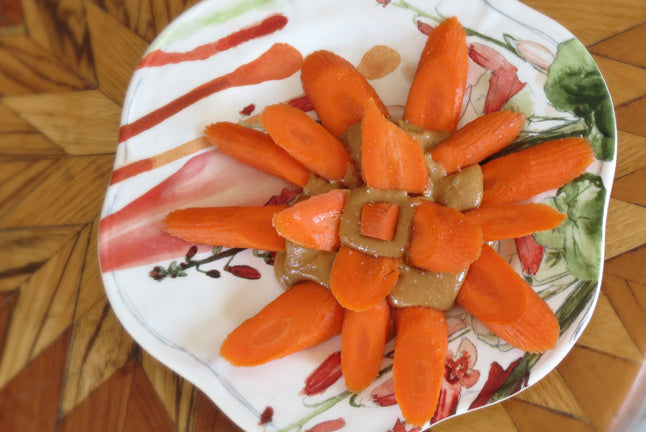
Hungry, but have no time to make anything? I love to just grab carrots and peanut butter because it's easy to make and sure fills me up quickly too!
You can bite on a whole carrot if you want, but sometimes I like to spend a little time to make my food pretty. It really brings more joy to see my food looking pretty. All I did was cut the carrots at a slant and scooped some peanut butter on a dish. Next is the fun part -- arrange the carrots in the peanut butter and it's ready to serve!
Carrot doesn't have starch so it's lower in carbohydrates. It offers manganese and potassium, and all sorts of vitamins: A, B1, B2, B3, B6, C, E, and K. What does all that mean? It means carrots are helpful for protecting your vision, reduce your risk of strokes, help kill germans in your mouth and protect your teeth. There's also a lot of fiber in carrots so be ready to put your teeth and jaw to work!
Peanut butter can help control blood sugar due to low gluten content. It also contains healthy oils, protein, fiber, magnesium, vitamin E, B-complex. It can also help control blood sugar.
When it comes to picking out peanut butter, look for ones with only 1 ingredient: peanuts. Other kinds such as Classic American has a lot of sugar, salt and other oils added to it. I usually prefer to get things plain so I can control the amount of other ingredients if I were to add any in my peanut butter. Sometimes I just want to change up the flavors to make my food more exciting, you know what I mean?
Ingredients:
2 carrots
2 scoops of peanut butter (I use the plain, 100% peanut)
a light sprinkle of sea salt (this is for taste, totally optional)
Ashitaba over Chicken and Rice September 03 2013
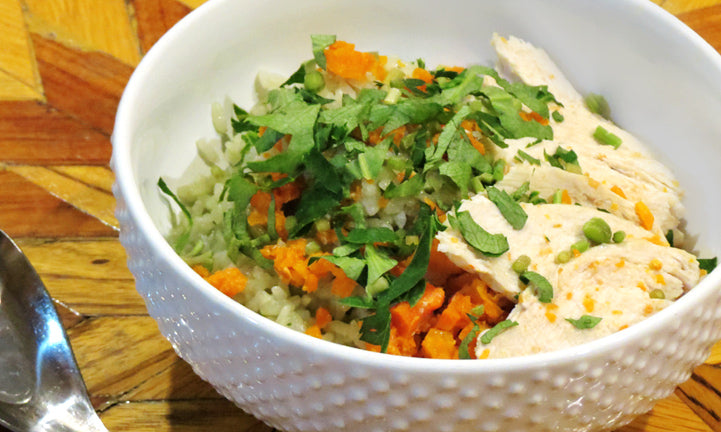
While some people are at the beach BBQ this weekend, I stayed home with my dog, Lotus. We made steamed chicken instead of grilling -- it's a lot healthier and juicier than grilling. It is also one of the regular meals I share with Lotus. Steaming is so easy and quick to make. It also helps to keep more nutrients in your food through steaming rather than frying. And you don't need to add any oil when steaming! I usually don't add any salt to it until it's served on my bowl. Or don't add any salt to yours at all sometimes! I used to eat more salty food, just like many of us do, but slowly I have adopted a healthier lifestyle by reducing salt/sodium in my food. Your meals may taste a little bland at first, but if you give it some time, your taste buds will slowly adjust to plainer foods and start to appreciate the natural flavors in every ingredient. Now I taste, I only sprinkle some salt in my food. Note, I said "Sprinkle." There's really just a few specks of salt within every inch on my plate if you want to be precise. I often get a heart attack when watching cooking shows because the way they sprinkle salt is like pouring rain! What I'm saying is just to gradually reduce your salt intake to let your body and taste buds adjust. If you suddenly cut out salt without allowing for your palette to adjust, you would hate the taste of your food. I also filmed a video on Ashitaba this weekend so I had some left over leaves. I chopped them and sprinkled over my meal like you would with cilantro. The leaves really just taste like celery leaves to me. It's a nice herb to compliment my red rice, chicken and carrots.
Ingredients:
2 chicken breasts
3-5 carrots
1-2 Ashitaba leaves
To Make:
Peel the carrots. You can add zucchini or any squashes you have around in this too. Throw everything in a blender or food processor to quickly break things up. Blend it just enough when they look about size of minced garlic. Placed them on the bottom of bowl or container. Remember to use a container that tolerates heat. *Please read my tips on choosing containers below.* Wash chicken breasts and place over carrots. Take the largest pot you have and pour water about 3 inches deep inside. If you have sometime to prop a bowl up, put that in the pot as well. This will help lessen the vibration when water is boiling. Now place your container with food inside, close the lid and turn the heat to high. It will take about 30 mins or a little longer to cook. Make sure to only serve your chicken when it's thoroughly cooked. Use a knife to cut the meat in deepest part of the meat to check. The meat should be solid white all the way through. Any translucence in the meat means it's still raw! Chop up the Ashitaba leaves and sprinkle over your well done food. Enjoy! :)
Tips!
Our body absorbs nutrients much faster and easier through finely cut food. That's why sometimes I puree some of the ingredients. You can puree your whole meal if you wanted to, but I like to preserve some texture in my food so I won't feel like I'm eating baby food. Hah Stay away from plastic containers when heating your food. It's very toxic if any plastic melts into food. Make sure to read labels carefully when picking out kitchenware to use. There are plastic containers that take heat, but for steaming, I like to stay away from this material because it gets really hot with heat trapped in the pan. You will also be steaming for 30 or more minutes. That's a long time... I prefer to use glass for most of my food, but do make sure glass you choose can take heat. I use pyrex containers to steam and store my foods. But it is glass after all so I still try to be more careful -- only put glass in steaming pot while it's still cool. Let everything inside slowly heat up. I don't want to risk any chance of glass breaking due to drastic temperature change.
Fresh Fruits With Yogurt For Breakfast August 31 2013

It's been so hot these past few days. The room was pretty warm by 8am this morning so I felt like having something lighter, fresh, but also filling to keep me going for the day.
I love having raw yogurt. It is not only filling, but the probiotics (good bacteria) can help strengthen my immune system. I always get the plain, unsweetened kind since I like the flexibility of changing things up! I can always add some honey on the days I want it a little sweeter and some other days plain. I generally stay away from sugar added yogurts because sugar breeds bacteria! Honey, on the other hand, has antioxidant properties but can satisfy my sweet tooth. Yogurt is also helpful to those with urinary tract infection (UTI) since the probiotics can help you fight and flush that bad stuff out, but make sure to get the unsweetened kind. If dairy isn't in your diet, there are so many other options now a days...you can try coconut yogurt, it's really yummy! 
Since it's Summer, my jambu tree is fruiting again! It's always so exciting to see different fruits come in different times of the year. Jambu is an exotic fruit that is very slightly sweetened, and crunchy. Thus, I picked a few and paired it with some fruits I had around the kitchen.
Oh beautiful pomegranates ~ You are such beautiful bright, saturated red jewel for the summer. It's high in antioxidants and the seeds are very good for you, particularly for women. So don't spit the seed out when you eat them, chew it and swallow! I wish I had known that the seeds are edible sooner. I grew up with my family telling me not to eat the seeds. Hah.
The dark brown flakes sprinkled on top are chocolate nibs! What is a chocolate nib? Chocolate or cocoa nibs are cocoa beans that's roasted and separated from their husks. What's left in the nib is a crunchy, chocolaty flavor. They are also a good source of magnesium, potassium, calcium, copper, iron, and zinc without the sugar.
Now that I've mentioned all the goodies in these ingredients, it's time to share my recipe.
Ingredients:
Raw organic yogurt (coconut yogurt can be an option for dairy-free diet)
1/2-1 apple
4 jambus
Sprinkles of pomegrante
Sprinkles of chocolate nibs
honey
To Make:
Cut all your fruits to bite size. You can use any fruits you have around. The ingredients above is only to tell you what is in my bowl. Scoop some yogurt in a bowl then add the cut fruits. Sprinkle chocolate nibs and drizzle honey on top. Oh so delicious and refreshing. What a breakfast that's also high in fiber. This bowl sure kept me full for hours.
Ashitaba August 22 2013

About Ashitaba:
Ashitaba, AKA "Tomorrow's leaf" -- is the plant that offers many medicinal properties. It is rich in anti-aging properties that helps maintain smooth, young skin. It is high in vitamin B-12, vitamin C, calcium, iron. Ashitaba helps detoxify the liver and kidneys, strengthen cartilages, bones (osteoporosis) and tendons, purifying blood, improving the immune system, treat hypertension, reducing the risk of cancer and the risk of brain disorders and heart problems.
Many mistaken this Ashitaba with others in the Angelica family. The true Ashitaba (scientific name: Angelica keiskei koidzumi) as you can see in the photo -- the potent/medicinal variety has the yellow sap in the stem when it is more mature. I cut the largest stem of mine to show you in the photo. The base of a fully mature Ashitaba is the size of your wrist!
How to eat it?
The entire plant is edible. The yellow sap is most potent and the leaves can be made or boiled as tea. I would describe the taste of stem as a gin and tonic with a celery stick! Sounds pretty exciting right?
How to Grow:
Ashitaba grows best at 75-85F. It prefers the soil to be a little moist. *Note that moist means a little wet, not drowning wet.* Depending on the environment your plant is in. Sometimes the plant may require watering once every few days or once every other day. In the colder days, lesser water is required since soil can retain moisture longer. Keep in mind not to over water or the roots can rot.
In Southern California I grow them in the shade and only gets morning sun. Depends on where you live, some people grow them in greenhouses or with a plastic bag covering over the plant to keep it warmer when it's cold. Ashitaba can tolerate up to 20F, but it will go dormant in the winter. This means the plant will die back during this period, but it should come back in spring/when weather warms up. (Don't assume the plant is dead and throw it out! It is only dormant stage.) Ashitaba requires soil to stay moist, and fertilizing it monthly during its growing period.
Ashitaba is a biennial plant which means it has about 2-3 years lifespan. After it reaches its full life, the mother plant will flower, seed, and die. Depending on the conditions, seeds should sow and baby plants will be reborn.
When it comes to soil, Ashitaba does best in soil-less soil. In this case, I used coconut coconut core mixed with a little bit of compost. Because Ashibata is so nutritious the bugs like it too so growing them in soil-less soil would reduce the chance of bugs eating up your plant!
Please contact me if you are interested or have any questions about this plant. :)
**Disclaimer**
Description is for educational purposes only. This information has not been evaluated by the Food and Drug Administration. This information is not intended to diagnose, treat, cure, or prevent any disease.
Vegetarian Soup Topped with Gynura Leaves August 13 2013


I have not harvest from the garden for almost a week -- so many tomatoes and beans were just screaming "pick me!" So I did. After collecting an abundance of beans and tomatoes I decided to make a vegetable soup. I also added other veggies I have laying around the fridge and vegetable broth as base. Making soup is one of the quickest ways to use all the overstocked or overripe ingredients since they are not as pleasant eaten raw.
There are almost no rules when it comes to making soup or broth. You can use any ingredients to your preference and as much of them as to you like. Keep in mind the longer the soup is cooked, the softer the ingredients will be so they may fall apart. That's why I prefer keeping the vegetables in a larger size. Below are the ingredients I used for mine.
Ingredients:
1 can of vegetable or chicken broth
1 cup of beans (if you are using dried beans, let it soak overnight in filtered water to speed up the cooking time)
5 carrots (cut to large bite sizes)
3-4 tomatoes
1 onion (would be tasty, I just didn't have one to add to my soup)
1 cabbage (cut to desire size)
3-5 Gynura Procumbens leaves for each bowl you serve
sea salt (for taste if desire)
To Make:
Cut all vegetables to your size preference. Place carrots, beans, onion, and tomatoes in a pot then add the broth. Boil over high heat with lid off. Until soup comes to boil reduce heat to medium-low and let it slowly cook to soften. Put the lid on at this point. It may take 30-50 mins to cook until everything is mostly soft. Remember to come back to check on your soup from time to time.
When everything is mostly soft, add cabbage and a little dash of sea salt. I recommend not to make your soup very salty as it is better for your health. Too much salt also takes away from the sweet flavors that come from vegetables.
Before serving, cut thin slices of Gynura leaves to place on top on the boil. You can stir them in as you eat. It's good to add this ingredient last so it won't get cooked. *Enjoy!*
Gynura Procumbens Stir Fry with Omelette August 03 2013


One of my favorite simple foods to make is onion, tomato omelette served over rice. You can make this for breakfast or anytime of the day. Sometimes for breakfast I like to have the omelette without any fillers with it. Using the omelette in a sandwich would be just as yummy, but rice is one of those comfort foods for me.
Ingredients:
tomatoes (as many as you like. I used 20 of my cherry tomatoes)
1/2-1 onion
1 or 2 eggs (depending on portion you like)
a few Gynura Procumben leaves
rice or bread *optional* (I used red rice mixture, but anything except white rice would be healthier. Wholewheat is better than white for bread)
sea salt and pepper to taste
Oil that takes high heat (I used unrefine coconut oil, but canola or sunflower oil can be other options)
To Make:
Pour a little oil in a pan and set it to medium high heat. Give it a short moment for oil to heat (usually takes just 20 seconds or so). Cut onion to thin slices and carefully add them in the pan then allow it to soften a little. Stir the onions now and then to keep it from burning.
Cut tomatoes into smaller chunks then add them in. Set heat to medium or medium low and let everything slowly cook to soften and caramelize. Push the ingredients around now and then will prevent things from sticking to the pan and burning.
Crack 1 or 2 eggs in a separate bowl and use a fork to whisk. Whisking until the yolk and egg white mix a bit will be enough. Add a small pinch of sea salt and pepper for taste. This is to flavor the food a bit. If you want to make it a little more salty you can sprinkle a little more salt on top before serving. This will give you more control on how salty your food gets. You can always add more, but taking something away in cooking would be difficult!
When onions and tomatoes became to caramelize, it's time for the egg to go in! If the pan looks a little dry at this point you can add a little more oil to fry the egg. Now increase heat to medium high and wait for about 8 seconds so oil heats up. Now slowly pour the egg over the ingredients and let it cook to harden a bit. When the egg binds more with everything set heat to medium and let it cook until omelette takes shape.
Slice Gynura Procumbens thinly. When omelette is more harden (not runny), add the Gynura in. I like to add Gynura last so it won't get cooked for very long. You can flip the omelette over and let the other side cook evenly. Serve it with a side of rice or bread! I had some left over rice so I just added a thin layer of rice on top of the omelette to warm it. I pressed the rice into the omelette firmly so it forms as a second layer then cut them in squares. You totally don't need to do that! haha *Enjoy!* :D
*Tips!*
- If the pan starts to smoke or create burning smell turn heat down a little. You want to cook your food, not burn it.
- Using a non-stick pan is always easier to fry eggs, but remember not to use metal utensils to prevent scraping any material on the non-stick pan. That stuff is not healthy for you!
- If you want to keep the nutritional benefits of Gynura Procumbens keep it as raw as possible in your food. Over cooking it can reduce the benefits of them.
Gynura Procumbens Fruit Salad August 03 2013

My freshly picked ingredients for my salad that's all from the garden. Although summer can get pretty icky during the day, but when you get to harvest all the beautiful fruits -- it is rewarding and delightful!
Many diabetics are afraid of eating fruits or anything sweet, but there are some fruits that are actually healthful if consumed in moderation. Strawberries provide carbohydrates, fiber and vitamin C. Fiber is important part of a diabetes diet and it helps with weigh loss.
Tomatoes is packed with vitamins A, C, and K. Tomatoes and strawberries are both low calorie fruits that is nutritious and will keep you feeling full for a while.
For the dressing I used raw apple cider vinegar and a little honey to sweeten. If you want something sweet to add in your food, raw and pure honey is healthier than sugar. Honey also provides antioxidant, vitamins and nutrients such as B1, B6, B12, C, E and Biotin! Biotin is one of the B complex, known as vitamin H. It helps to maintain a healthy nervous system and aid in digestion. Make sure you get a good quality organic honey that says "raw, pure, or unfiltered" on the label. Ingredients in the back label should only say honey, nothing else. Hope you enjoy this summer delight!
Ingredients:
Gynura Procumbens -- washed and sliced thinnly. Use as much as you like just like any greens in your salads.
1 Large tomato or 2-3 smaller ones
a small hand full of strawberries or any berries you love.
Dressing: a splash of raw apple cider vinegar
light drizzle of raw honey.
Smoothie for Breakfast! August 02 2013


I call this my breakfast smoothie, but really you can have it anytime during the day. I prefer drinking it in the morning because it nourishes me throughout the day. I put any kind of veggies and fruits I have in a blender and out comes a glass or two of a healthy green smoothie. It's so much easier and faster to drink a glass of nutritious foods than to eat them.
Base Ingredients:
5-7 kale leaves
3-5 Gynura Procumbens 1 celery
1/2 a lime or lemon
Above are the main ingredients I use for my green smoothies. All these ingredients except for the lime came straight from my garden. It can't get any fresher than that! Kale is a superfood that's packed with nutrients so it is a nice base for the smoothie. Celery helps with lowering blood pressure. Lime or Lemon is alkaline and the citrus juice makes the smoothie go down easier. Citrus tends to bring out the flavor in leafy greens and make it easier to acquire. Gynura Procumbens helps with lowering blood pressure, cholesterol and blood sugar. Whether you believe in folk medicine / natural remedies or not, I think majority of us would agree that leafy greens are good for our health! It helps to detoxify and put lots of healthy energy in our bodies.
Green smoothies are definitely not everyone's favorite. Much like wine -- it takes time to acquire to the taste. Green smoothie with just the ingredients in the photo would taste a little bitter and hint of sour. Don't say that I didn't warn you! But I like this taste. The bitter note reminds me of a dark tea. If bitterness is something hard for you to tolerate, you can add a fruit in it. Fruits like apples, dried dates, grapefruits, pears, peaches, or prunes have lower glycemic index so it wouldn't spike your blood sugar if you are cautious of that. Dried dates is one of my favorite sweeteners for my smoothies. I add just 2-3 of them to very lightly sweeten my smoothies.
Blending your food is a great way to feed it to your body because we cannot chew everything so finely. Seeds in strawberries for example, are so small making it difficult to chew. When you blend your food, it breaks down the fiber and nutrients making digestion easier and faster for our body!
Be sure to make your juices/smoothies with a blender not a juicer. A juicer strains out all the fibers in our foods while a blender only chops them up very finely. Fiber is good for us so don't throw them out, eat, drink them!
Gynura Mango Salad August 01 2013

This is a salad that anyone can enjoy. Even a diabetic! Many of us, including myself, thought mango is such a sweet fruit so it's not good for a diabetic. Interestingly, research have shown that mango has a low glycemic index (GI). Glycemic index is the numbers used to represent how much the blood sugar would rise after consuming a particular food. Eating food with high GI would spike the blood sugar. Although mango can be consumed by someone with diabetes or pre-diabetes but eating in moderation is always the key!
Here's one of my favorite salads I enjoy eating whenever I have a mango laying around.
Ingredients:
1/2-1 mango (if you have diabetes I would suggest to try smaller quantity first) :)
1 boiled egg red or brown rice, cooked. (stay away from white rice!)
Gynura Procumbens, cut in thin stripes
roasted minced garlic (or mince fresh garlic if you can handle it!)
Dressing:
1-2 tablespoons of RAW Apple cider vinegar
olive oil
very small dash of salt, sprinkle this over your salad.
For dressing I just drizzle the vinegar and olive oil over the salad then toss before I eat. Be gentle with the apple cider vinegar, the smell is strong. Adjust according to your taste slowly.
Some Tips:
If you can find "brown basmati rice" at your local health market they have much lower GI. White rice have a higher GI so it is not recommended. I added rice to my salad for some carbohydrates which keeps me full a little longer.
- Garlic helps to get your blood circulating, lowering blood pressure.
- Egg is good source for protein.
- Gynura Procumbens help regulate your blood sugar!
- Raw apple cider vinegar has probiotics which strengthens your immune system. It also helps with lowering your blood sugar.
- Olive oil has good fat that your body can use. Specifically omega-3 and omega-6. Olive oil can help fight cholesterol and prevent heart disease.
As always, I encourage you to do more research -- learn and experience your foods. See what works for your body. Eat healthy, exercise, laugh a lot! Good luck to you and your health! :)
Honeycomb Cake (Banh Bo Nuoung) June 11 2013
")
One of my favourite desserts of all time is the Vietnamese honeycomb cake in Pandan flavour. It is a light, chewy, spongy dessert with a soothing, sweet aroma of Pandan. Everytime I walked in a Vietnamese Bakery I was always tempted to pick these cakes up, but I kept telling myself I will make these one day as organic as possible especially without food coloring. Yes, Pandan extract have green food coloring in it! Since this cake calls for this ingredient, and I couldn't find the extract without food coloring, I decided to buy Pandan leaves to blend into juice and use it as a replacement.
My cake here is green but the color is all from the leaves, there is no food coloring! It's amazing how natural ingredients can bring such beautiful colors to your food without the need of adding any dye. Go for it! Try the recipe I modified. Good luck and have fun!
Ingredients:
1 3/4 cup of coconut milk (or use 1 full can of coconut milk)
3/4 cup cane sugar
2 cups tapioca starch
2 teaspoon rice flour
2 teaspoon cream of tartar + 1 teaspoon baking soda
6 extra large organic eggs
2 teaspoons unrefine coconut oil
1 teaspoon vanilla extract
6-8 Pandan leaves (or 1/2 teaspoon pandan extract)
unrefine coconut oil to spread on baking pan
Step 1
Preheat oven at 325F and place baking pan inside to heat. I used a cast iron skillet because I don't like using non-stick bakeware.
Step 2  *If you are making your own pandan blend follow this step. Otherwise, skip this if you are using pandan extract.*
To make your own pandan blend, wash and dry 6-8 pandan leaves and chop them into 1/2 inch pieces. This will make it easier for your blender. You will need a more powerful blender to do this since regular blender may not be able to blend these tough leaves so fine.
Pour coconut milk and chopped pandan in the blender to blend until pandan are finely blended into coconut milk.
Step 3
Pour your coconut milk (or pandan coconut milk) in a sauce pan over low heat. Add sugar in and stir to mix. Turn heat off when sugar has melted and mixed with coconut milk.
Step 4
In a small bowl -- place cream of tartar and baking soda in and mix well then set aside.
Step 5  In a mixing bowl -- Put 6 eggs inside and pierce the yolk and gently drag it around a few times for the yolk and egg white to mix.
Add 2 teaspoons of unrefine coconut oil and vanilla extract with eggs and gently use a whisk to mix until everything blends well. *Do not whip, just stir to mix* Now add coconut milk you prepared earlier in and stir to mix well.
Step 6
Place a sifter over your wet ingredients and slowly pour tapioca starch through it. Add half of the tapioca starch each time then gently stir to mix. Slowly mix to work out the lumps in the batter.
Step 7
If you are making this with pandan extract, now you can add the extract in. Otherwise, skip this step.
Step 8
 You are almost done!! Now add the cream of tartar and baking soda mix you made in your batter and stir to mix. You will start to see the batter getting frothy. Keep mixing until everything blends well.
Step 9
") Take the baking pan out of the oven and brush coconut oil all around. Now place a sifter over the baking pan and slowly pour your batter in. Place your baking pan in the oven to bake for 30-40 mins. Place a toothpick in the cake, if toothpick comes out clean, your cake is done! Your cake should have a light golden brown top.
Take the baking pan out of the oven and brush coconut oil all around. Now place a sifter over the baking pan and slowly pour your batter in. Place your baking pan in the oven to bake for 30-40 mins. Place a toothpick in the cake, if toothpick comes out clean, your cake is done! Your cake should have a light golden brown top.
Take your cake out of oven and remove the cake from the baking pan. Place the cake on a cooling rack and try it when it's cooled!
Soft Pandan Cookies March 27 2013

Though I'm not any part Irish, but whenever Saint Patrick's Day rolls around, I get pretty excited about it. No, it's not the green beer I get excited about, the excitement is because I get to be creative with my food! This year I've introduced a new flavour in my cookies to our Irish friends. They are Pandan Cookies!!! Even though the taste reminds you nothing about the Irish, but the color does.
Pandan (Pandanus) is a type of screwpine that grows in Southeast Asia. Some call this the Eastern or Asian Vanilla due to its wonderful sweet and creamy aroma. Pandan is broadly used in Thai, Vietnamese, Singaporean, Malaysian cuisines and desserts.
Ingredients:
6-7 Pandan leaves
fresh or frozen (thawed if they're frozen) 1 1/3 cup all purpose flour
1/3-1/2 cup of cane sugar
2 pinches of salt
1 egg
5-7 tablespoons of unrefined coconut oil
1/2 cup of thick coconut cream
2 shakes of cream of tartar
small pinch of baking soda
1/2 teaspoon baking powder
2 tablespoons of toasted sesame seeds
To make:
Preheat oven to 350F.
Cut Pandan leaves into smaller pieces. Pour Pandan cut leaves, coconut milk, coconut oil, salt, sugar, egg in blender to blend until everything is pureed. Set aside.
Pour flour in a mixing bowl, add cream of tartar, baking soda, baking powder and mix well. Next, pour the wet ingredients with flour. Stir to mix well.
You can either pour this batter in a cookie mold. If you want to make them freehand, you can add a little more flour to the batter to thicken if it's too runny -- adding flour will thicken the batter making it more workable with your hands. Make balls about 1 1/2 inch diameter and place them in a cookie sheet. Spread each ball about 2 inches apart all around. You can either grease the cookie sheet with coconut oil, or place a sheet of parchment paper down to prevent cookies from sticking. Sprinkle some sesame seeds on top.
Place in oven and bake for 20-25 mins., or until crust is very light brown. When baked goods are getting close to being ready, you will start to smell the aroma! Carefully remove cookies from molding or cookiesheet to place on cooling reck.
Raisin soda bread December 14 2012

After a full day of heavy meals, I just felt like having a simple, wholesome bread. Raisin soa bread is one of the simple breads I like to eat on a cold night. Maybe even drizzle it with some honey and have it with a cup of hot tea.
Ingredients:
1/3 cup of steel cut oat grinded (keep it a bit coarse for texture)
1 2/3 cup of white spelt flour
2 teaspoons baking soda
2/3 cup buttermilk
a pinch of celtic sea salt
a pinch of coarse cane sugar
1/2 cup of raisins
Total bake time 45-50 min.
Preheat oven at 350F. Lay some grinded steel cut oat on a cast iron skilet or a cast iron crepe pan then set aside.
Mix all dry ingredients in a mixing bowl then slowly pour buttermilk in and gently stir to mix. The dough should look a bit lumpy and moist, but it won't stick to the mixing bowl. If dough looks a bit dry, add a little more buttermilk to mix.
Remove dough from mixing bowl and place on the counter to knead a few times. Do not over knead it. Gently shape the dough into a round shape by patting around it. Sprinkle some flour all around the dough ball and place it on pan. Score a "+ "sign on the dough and place in oven to bake. Once dough is in oven, increase temperature to 400F for 5-7 mins then increase temperature again to 450F. After 10 mins drop temperature to 350F and bake for another 30-35 mins. When crust turns a light golden brown the bread is ready!
Take bread out of oven and set it on a rack to cool for at least 20 mins. Enjoy your light, simple bread with thin, crunchy crust. :)
- Page 1 of 2
- Next